This post describes how you can have a flexible load balancing arrangement in CoreOS using nginx and confd running in separate containers.
I’ve been doing a lot of experiments with load balancing scalable web services recently. The systems I’ve been developing have been shaped by the ideals of the 12 factor app and the realities of using docker. For a production system I’m looking for something with the following qualities
- as simple as possible – really that just means the smallest number of moving parts, and parts that are easy to understand and troubleshoot
- easy to add/subtract nodes to meet capacity
- provider-agnostic – I could do some of these things with AWS, but I’d like to have more control over the costs as well as being able to deploy anywhere – in particular, I find it very useful to be able to model a system locally
What I’ve been having the most success with is CoreOS, which is a operating system designed to support running containerized applications across a cluster.
The 1000ft view
The rest of this article will illustrate a simple example of balancing multiple web application containers with nginx across a cluster of machines using CoreOS.
Here’s what we are going to build…
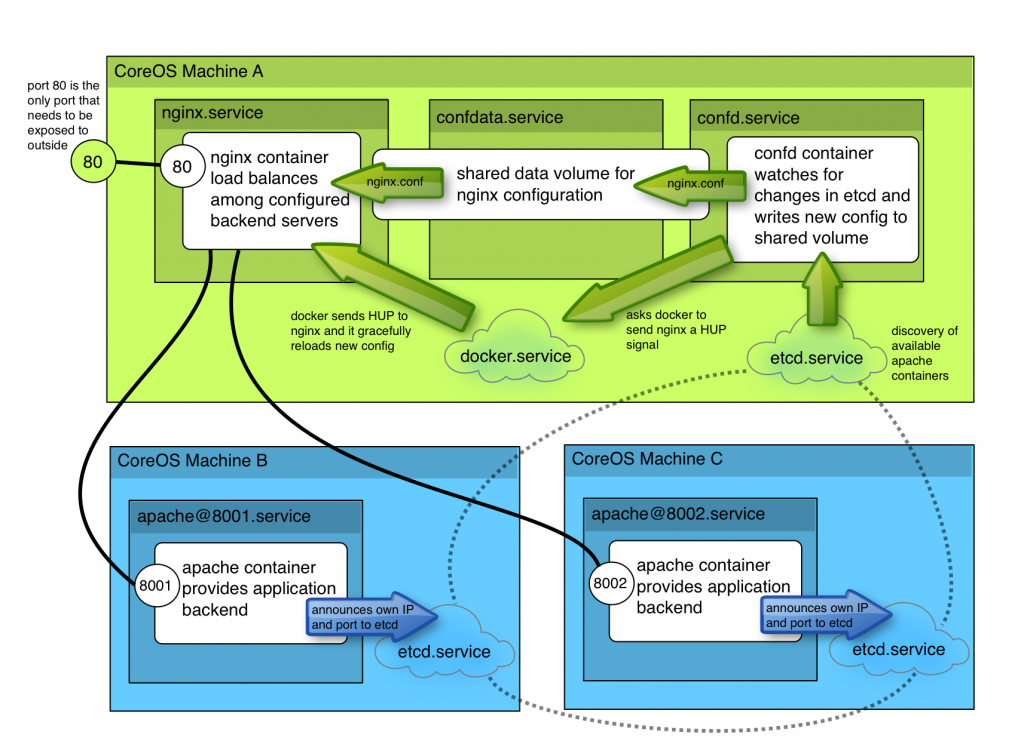
- a simple apache container to represent our application – it will register itself with etcd allowing all available containers to be discovered
- a data-volume which confd can write its configuration into
- a container running confd which watches for changes in etcd and builds an ngnix configuration file to load balance amongst available containers
- finally, an nginx container which obtains its configuration from the shared volume
Once it’s up running, you’ll be able to easy add new apache containers and have them automatically added to the load balancing backend.
All the files I’ve covered in this demo are available at https://github.com/lordelph/confd-demo
First, you’ll need a CoreOS cluster
If you want to follow along, you’ll need a simple CoreOS cluster. You can run a 3-server cluster on your laptop with Vagrant.
Apache container
We’re going to start at the bottom and work our way up. So, need something to act as our application backend. No need to reinvent the wheel here – the tutum/hello-world image provide a basic apache server serving a “Hello World” page on port 80.
In order to deploy this docker image on our CoreOS cluster, we need define a fleet service:
apache.service (src)
[Unit]
Description=Basic web service port %i
After=docker.service
Requires=docker.service

[Service]
EnvironmentFile=/etc/environment
ExecStartPre=-/usr/bin/docker kill apache-%i
ExecStartPre=-/usr/bin/docker rm apache-%i
ExecStartPre=/usr/bin/docker pull tutum/hello-world
ExecStartPre=/usr/bin/etcdctl set /test/apache-%i ${COREOS_PRIVATE_IPV4}:%i
ExecStart=/usr/bin/docker run --rm --name apache-%i -p ${COREOS_PRIVATE_IPV4}:%i:80 tutum/hello-world
ExecStop=/usr/bin/etcdctl rm /test/apache-%i
ExecStop=/usr/bin/docker stop -t 3 apache-%i
Save that as apache.service and then create two symlinks to it called apache@8001.service and apache@8002.service. In the unit file, the %i placeholder is replaced with the text after the @. So, let’s consider what happens when we run start apache@8001.service
- Firstly, it pulls in /etc/environment. This is so we can use the
COREOS_PRIVATE_IPV4environment variable later on in this unit definition - The unit attempts to kill and remove any existing container called
apache-8001. Note that these commands start with-which allows the unit to tolerate failure. In normal operation, we’d expect these lines to fail. - Now we reach the fun part – we write the exposed IP address and port of the apache container we’re about to start into an etcd key
/test/apache-8001. This allows anything that’s interested across the cluster to discover our newly minted container. I’m deliberately keeping things simple for this example, I’ll cover how to make this more robust later. - Next, the ‘real’ process is started – our apache container. The key thing to note is that we’ve exposed port 8001 on the
${COREOS_PRIVATE_IPV4}address to port 80 inside the container - When the unit is stopped, we have some extra lines to remove the etcd key value and then finally stop the container
Now we start our two apache units with fleetctl:
fleetctl start apache@8001.service
fleetctl start apache@8002.service
Now we can use fleetctl list-units to see where our units were started:
fleetctl list-units
UNIT			MACHINE				ACTIVE	SUB
apache@8001.service	d18b9f38.../172.17.8.101	active	running
apache@8002.service	852e1729.../172.17.8.102	active	running
We can use use etcdctl to list the keys our units created for us:
etcdctl ls /test
/test/apache-8001
/test/apache-8002
We can also inspect one of those keys just see what IP and port a given unit is exposing:
etcdctl get /test/apache-8001
172.17.8.101:8001
Fantastic – so now we can create as many apache containers as we like they will automatically announce themselves to etcd.
confd data volume
confd is a daemon which can be configured to watch for changes in etcd keys, and then generate configuration files from template files filled in with current etcd values. So, what we’re going to do is create a container to run confd which creates an nginx configuration load balancing our apache servers.
Since we’re sharing some files between two containers, we’re going to need a data volume. A data volume isn’t really a ‘process’ but we can still manage it with fleet to keep things consistent. Here’s confdata.service, a unit file for creating our data volume
confdata.service (src)
[Unit]
Description=Configuration Data Volume Service
After=docker.service
Requires=docker.service

[Service]
Type=oneshot
RemainAfterExit=yes

ExecStartPre=-/usr/bin/docker rm conf-data
ExecStart=/usr/bin/docker run -v /etc/nginx --name conf-data nginx echo "created new data container"
The main trick here is to make the unit a ‘oneshot’ unit, which tells systemd we expect ExecStart to run just once. We don’t want systemd to keep retrying the ExecStart line. Secondly, RemainAfterExit=yes just allows the service appear successfully executed, which lets us hang some dependancies off it later.
The rest of the unit clears the volume if it already exists, and then creates a new container. Note that I use the nginx image rather than something small like busybox. There are several reasons for that
- The volume will be filled with default configuration files for nginx
- Files and directories will have the right owners and permissions
- I’m using the nginx container anyway, so why waste disk space pulling in a different container for a data volume?
So, now we can start our confdata.service with fleetctl, and it will create a container called conf-data to provide us with a place to store our nginx config.
fleetctl start confdata.service
fleetctl list-units
UNIT			MACHINE				ACTIVE	SUB
apache@8001.service	d18b9f38.../172.17.8.101	active	running
apache@8002.service	852e1729.../172.17.8.102	active	running
confdata.service	ba3f5fc0.../172.17.8.103	active	exited
Now we’ve got somewhere we can write an nginx config, let’s set up confd to do just that…
confd-demo container
This confd-demo image is available from the public repository as lordelph/confd-demo, what follows is the details of how it is built so you can tweak it for yourself!
We’re going to create a new image to run confd, so create a new directory with a Dockerfile like this in it
confd/Dockerfile (src)
FROM ubuntu:14.04

RUN apt-get update && \
    DEBIAN_FRONTEND=noninteractive apt-get -y install curl && \
    curl -o /usr/bin/confd -L https://github.com/kelseyhightower/confd/releases/download/v0.7.1/confd-0.7.1-linux-amd64 && \
    chmod 755 /usr/bin/confd && \
    curl -sSL https://get.docker.com/ubuntu/ |  sh

ADD etc/confd/ /etc/confd

CMD /usr/bin/confd -interval=60 -node=http://$COREOS_PRIVATE_IPV4:4001
This is fairly simple, it just installs a binary release of confd. Note this example also installs docker, but since writing this I’ve changed that approach – see note below.
You’ll need to create an etc/confd directory alongside the Dockerfile, this is where we’re going to keep our confd configuration and templates.
Finally, its startup command launches confd. The default interval for checking etcd is 10 minutes, so I’ve dropped that to a minute. confd also needs to know where to find etcd – we use a environment variable to allow us to specify the location when we start the container.
confd/etc/confd/conf.d/nginx.toml (src)
This file tells confd about the keys we want to watch, and what actions we want to take when they change…
[template]
src = "nginx.conf.tmpl"
dest = "/etc/nginx/nginx.conf"
keys = [
    "/test",
]
reload_cmd = "/usr/bin/docker kill -s HUP nginx.service"
Pretty self-explanatory. When confd changes the nginx configuration, we want nginx to start using it. nginx will reload its configuration when it receives a HUP signal, and docker has ways of sending signals to containers. This is why our confd container includes docker – we use the docker client to communicate with our host machine and get it to send our signal.
EDIT – using the docker client is error prone as it’s easy to get a mismatched client and server. See this followup post for how you can send that HUP signal without the overhead of installing docker in the client. The code sample on GitHub has been amended.
confd/etc/confd/templates/nginx.conf.tmpl (src)
Final part of the container image is the template for the nginx configuration. This is a stock nginx configuration with a simple load balancing setup. Here’s the second which contains the template directives which confd will execute. The iterate over keys in /test/ and use the values of those keys to define a list of backend servers.
 upstream backend {
        {{range getvs "/test/*"}}
            server {{.}};
        {{end}}
    }
Here’s the full configuration:
user  nginx;
worker_processes  1;

error_log  /var/log/nginx/error.log warn;
pid        /var/run/nginx.pid;

events {
    worker_connections  1024;
}

http {
    include       /etc/nginx/mime.types;
    default_type  application/octet-stream;

    log_format  main  '$remote_addr - $remote_user [$time_local] "$request" '
                      '$status $body_bytes_sent "$http_referer" '
                      '"$http_user_agent" "$http_x_forwarded_for"';

    access_log  /var/log/nginx/access.log  main;

    sendfile        on;
    #tcp_nopush     on;

    keepalive_timeout  65;

    #gzip  on;

    upstream backend {
        {{range getvs "/test/*"}}
            server {{.}};
        {{end}}
    }

    server {
        server_name www.example.com;

        location / {
            proxy_pass http://backend;
            proxy_redirect off;
            proxy_set_header Host $host;
            proxy_set_header X-Real-IP $remote_addr;
            proxy_set_header X-Forwarded-For $proxy_add_x_forwarded_for;

            add_header  X-Handler  $upstream_addr;
        }
    }
    include /etc/nginx/conf.d/*.conf;
}
So, now we have our Dockerfile, our confd configuration, and an nginx config template, we can build our confd container image…
#change username to your public Docker registry username or
#the domain and port of a private registry
CONFD_CONTAINER="username/demo-confd"
docker build --tag="$CONFD_CONTAINER" .
docker push $CONFD_CONTAINER
Now we can define a fleet unit to run this container image
This service definition has a bit more going on that previous examples. We’re going to be using our data volume, so we make it dependant on that service with the After and Requires lines. It’s also important we’re on the same machine as that data volume, so we have a MachineOf directive too.
confd.service (src)
[Unit]
Description=Configuration Service

#our data volume must be ready
After=confdata.service
Requires=confdata.service

[Service]
EnvironmentFile=/etc/environment

#kill any existing confd
ExecStartPre=-/usr/bin/docker kill %n
ExecStartPre=-/usr/bin/docker rm %n

#we need to provide our confd container with the IP it can reach etcd
#on, the docker socket so it send HUP signals to nginx, and our data volume
ExecStart=/usr/bin/docker run --rm \
  -e COREOS_PRIVATE_IPV4=${COREOS_PRIVATE_IPV4} \
  -v /var/run/docker.sock:/var/run/docker.sock \
  --volumes-from=conf-data \
  --name %n \
  username/demo-confd

ExecStop=/usr/bin/docker stop -t 3 %n
Restart=on-failure

[X-Fleet]
#we need to be on the same machine as confdata.service
MachineOf=confdata.service
Most of the magic is in ExecStart, so let’s pick that apart
- we’re creating an environment variable
COREOS_PRIVATE_IPV4which is simply a copy of the variable from /etc/environment. Remember the Dockerfile uses this tell the container where to find etcd. (EDIT: this is flawed, see below) - We mount the docker socket from the host inside the container. This allows the docker client inside the container to talk to the docker server outside the container. That’s how we’re able to send our reload signal to nginx
- Finally, the place where confd writes the nginx log files is our data volume container
EDIT: using COREOS_PRIVATE_IPV4 to locate the etcd endpoint works in Vagrant, but isn’t the recommended way of discovering it. Really, you should the IP assigned to the docker0 interface. I’ve written another post about how you can do this more effectively.
Now, if we start this service, we should find it is scheduled on the same machine as the confdata.service
fleetctl start confd.service
fleetctl list-units
UNIT			MACHINE				ACTIVE	SUB
apache@8001.service	d18b9f38.../172.17.8.101	active	running
apache@8002.service	852e1729.../172.17.8.102	active	running
confd.service		ba3f5fc0.../172.17.8.103	active	running
confdata.service	ba3f5fc0.../172.17.8.103	active	exited
If you want to persuade yourself this worked, we can take a peek at our data volume by opening a shell in a temporary container and grepping the config file
docker run --rm -ti --volumes-from=conf-data nginx \
  grep -A6 'upstream backend' /etc/nginx/nginx.conf

    upstream backend {

            server 172.17.8.101:8001;

            server 172.17.8.102:8002;

    }
nginx container
So, we’ve got most of the moving parts now, we just need nginx up and running. This is a very simple unit
nginx.service (src)
We’re using the public nginx container, nothing fancy. We want to make sure we launch after the confd.service though, so that we’ve got a fresh configuration to use.
Note we haven’t used Requires=confd.service – that’s because stopping or restarting confd should not result in nginx being restarted. We could have used a Wants= directive, which would attempt to start confd whenever nginx is started.
[Unit]
Description=Nginx Service
After=confd.service

#we won't want it to require the service - that would stop us restarting
#it, which is safe
#Requires=confd.service

[Service]
EnvironmentFile=/etc/environment
ExecStartPre=-/usr/bin/docker kill %n
ExecStartPre=-/usr/bin/docker rm %n
ExecStartPre=/usr/bin/docker pull nginx
ExecStart=/usr/bin/docker run --name %n -p 80:80 --volumes-from=conf-data nginx
ExecStop=/usr/bin/docker stop -t 3 %n
Restart=on-failure

[X-Fleet]
#we need to be on the same machine as confdata
MachineOf=confdata.service
The other thing to note is that like confd, this unit is constrained to run on the same machine as the data volume.
fleetctl start nginx.service
fleetctl list-units
UNIT			MACHINE				ACTIVE	SUB
apache@8001.service	d18b9f38.../172.17.8.101	active	running
apache@8002.service	852e1729.../172.17.8.102	active	running
confd.service		ba3f5fc0.../172.17.8.103	active	running
confdata.service	ba3f5fc0.../172.17.8.103	active	exited
nginx.service		ba3f5fc0.../172.17.8.103	active	running
Take it for test drive
If all is well, you should be able to hit port 80 on the nginx machine and see the test server page. In the example above, it’s http://172.17.8.103/
In the nginx configuration, I set up an addition header in the response. If you view the response headers with Firebug or similar you should see an X-Handler header which tells you which backend server handled your request.
Try adding and removing apache units to the cluster. Remember confd is checking at 1 minute intervals, but once that time has passed, you should nginx using the new configuration.
Summary
With a small number of containers, we’ve got a system with the following characteristics
- nginx load balancing requests across multiple backend servers
- we can increase or decrease the number of backend servers dynamically
- we can deploy new nginx configuration without distruption
- we can cope with failure or forced restart of nginx, apache or confd
There’s one thing I simplified for this example, and that’s the way the apache container registers itself with etcd. A better way would be to have a second container for each apache container which verifies the apache container is up and writes an etcd key with a low TTL. that way, any failure of the container results in key removal, and any failure of the watchdog also results in key removal.
More links
Here are links to articles and resource I found useful while putting this together
- Experimenting with CoreOS, confd, etcd, fleet, and CloudFormation by Marcel de Graaf. This is a good walkthrough, but Marcel has nginx and confd running in the same container. From a robustness and flexibility perspective, that’s something I wanted to avoid.
- How To Use Confd and Etcd to Dynamically Reconfigure Services in CoreOS by Justin Ellingwood. I borrowed ideas from this article, and this shows how a watchdog container can keep etcd updated about the state of an apache container. This article also has nginx and confd running together though.
Hope someone finds this useful!
This has been very helpful! It was a great review of some of the other articles I have read in the past which you referenced. I want to setup something like this on DigitalOcean.
The thing I am a bit confused by is what happens if machine A of the cluster goes down. From what I understand is CoreOS can restart (randomly? I could be totally off on this…) when it is updating and during the time that machine A is restarting wouldn’t the entire site be offline? How will requests get routed to the other back end machines? Seems to me like you almost need a machine that is dedicated to load balancing that isn’t going to be down ever.
You are correct in that CoreOS can spontaneously reboot to keep itself updated but you can disable that. But the general question of how to maintain high availability is a good one – even if you stopped automatic updates, you still have to be ready for other failures.
You really need at least two load balancers constrained to be in different machines. In the past when I’ve done this, I’ve used heartbeat to perform a rapid ip takeover when the primary load balancer fails. That’s not an option for Digital Ocean though, and I’m exploring solutions for that.
One option is to have your DNS service dynamically update in response to failures. Amazon Route 53 or DNSMadeEasy offer such a service, for example. You have to keep the TTL on the records low, but it’s still possible for end users to be without service for several minutes.
It would be easier if Digital Ocean supported some kind of elastic IP (you can vote for such a thing here! )
At the moment, you’d have to look to AWS for a robust approach.
Pingback: Sending signals from one docker container to another | LordElph's Ramblings
Thanks for the feedback. I’ll look into Route53. I finally got around to following this whole thing tonight. You did a great job stepping through everything! I got stuck at the end though. My nginx instance would not seem to reload even though the config was changing. Manually restarting it would recognize the new config changes though. I figured out in the end that the versions of Docker had a mismatch since just by chance today a new version came out and the CoreOS stable is still on 1.4.1
Hopefully this helps anyone else running into this issue.
Matt, I did run into that and made an edit – rather than use the docker client inside the container, I used netcat to send http messages to the docker service on the host – see this for details http://blog.dixo.net/2015/02/sending-signals-from-one-docker-container-to-another/