Blue-Turquoise-Green Deployment

In this post I’m putting a name to something I’ve found myself doing in order to deliver zero-downtime deployments without any loss of database consistency.

The idea of Blue-Green deployment is well-established and appealing. Bring up an entire new stack when you want to deploy, and when you’re ready, flip over to it at the load balancer.

Zero downtime deployment. It makes everyone happy.

But…data synchronization is hard

Cloud environments make it easy to bring up a new stack for blue-green deployments. What’s not so easy is dealing with transactions during the flip from blue to green.

During that time, some of your blue services might be writing data into the blue database, and on a subsequent request, trying to read it out of green.

You either have to live with a little inconsistency, or drive yourself crazy trying to get it synchronized.

What about a common database?

This won’t suit all applications, but you can do blue-green deployment with a common data storage backend. The actual blue and green elements of the stack consist of application code and any data migration upgrade/downgrade handling logic.

Most of the time, if you’re trying to push out frequent updates, those updates are software changes with infrequent database schema changes.

So, you can happily make several releases a day with zero downtime. However, sooner or later you’re going to make a breaking schema change.

The horror of backwards incompatible schema changes

So, you’re barrelling along with your shared data backend, and you find the current live blue deployment will fail when the new green deployment performs its database migrations on your common data store.

Now you can’t deploy green without a scheduled downtime.

But you don’t want scheduled downtime! How can we do a zero downtime deployment and still retain the green-blue rollback capability?

Introducing Blue-Turquoise-Green deployment!

You need to create a turquoise stack. That’s the blue release, patched to run without failure on both a blue and a green database schema. This means it might have to detect the availability of certain features and adapt its behaviour at runtime. It might look ugly, but you’re not planning to keep it for long.
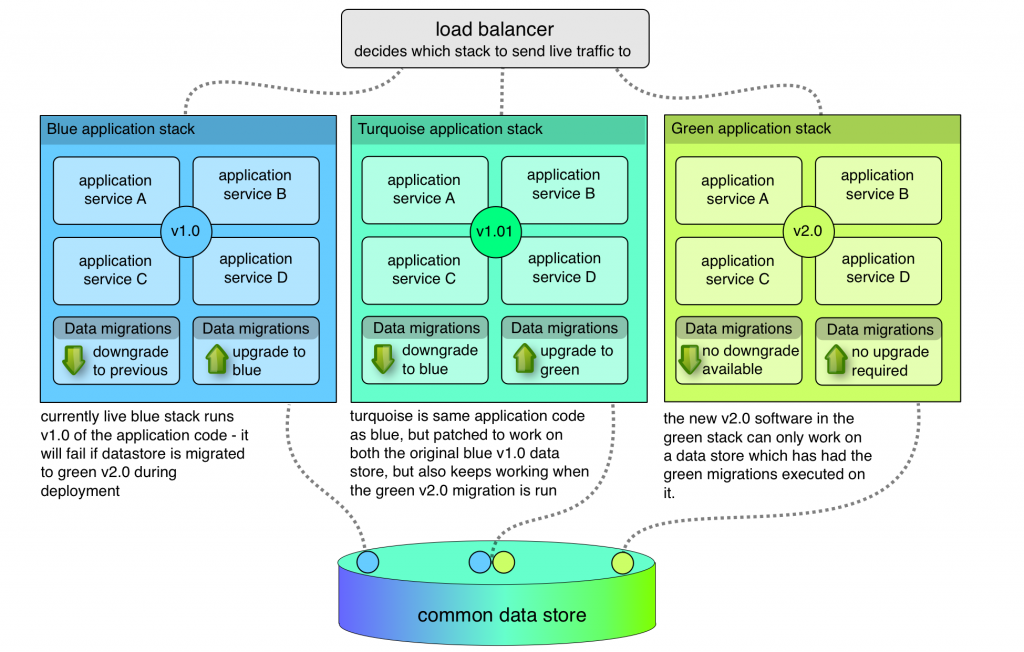
Diagram illustrating how 'turquoise' stack allows zero-downtime deployment on a shared data store

Now, you can perform a deployment of turquoise. It runs just fine on the blue database, and you can run the database migrations for green. It keeps on trucking. Now you’re safely running blue on a green-compatible database, you go ahead and deploy the green stack.

If you do run into problems, you’ve got everything in place to downgrade. Flip from green back to turquoise. Revert the database migrations, and you can then flip from turquoise to blue, and you’re back where you started.

Thinking in turquoise

For me, this has been more of a thought experiment. I’ve found that if you plan to do blue-green deployment on a shared data backend, you naturally adopt a ‘turquoise’ mindset to the migrations.

That means ensuring you design schema changes carefully, and deploy them in advance of the code which actually requires them. In order words, you build in that turquoise-coloured forward compatibility ahead of time, and you’re back to low risk, blue-green deployments!

Finally, why turquoise?

Because turquoise is a much nicer word than cyan. I should also say that I don’t claim this is a new idea. Giving a name to things makes it easier to discuss with others – I was trying to describe this approach to someone and wrote this as a result. Comments are welcome.

Sending signals from one docker container to another

Sometimes it’s useful to send a signal from one container to another. In a previous post, I showed how to run confd and nginx in separate containers. In that example, the confd container used the docker client to send a HUP to nginx.

To do this, the confd container had the full docker installation script run on it. That works, but adds a lot of needless bulk. You can also run into problems if the docker client you install is newer than the server you’re pointing it at.

But there’s an easier way – we can just make docker API calls using HTTP through its unix domain socket.

Step 1 – share /var/run/docker.sock from the host into the container

The socket we need is in /var/run/docker.sock, and we can share that when we launch the container with docker run -v /var/run/docker.sock:/var/run/docker.sock ...

Step 2 – send HTTP through the socket

Here’s a handy gist by Everton Ribeiro which shows various ways of doing this. Also note that the latest release of curl (7.40) has support for using a unix domain socket too.

I used netcat – here’s a simple example which should produce a result….

echo -e "GET /images/json HTTP/1.0\r\n" | nc -U /var/run/docker.sock

Check out the docker API documentation for more calls you can make. For example, let’s see how we can send a signal to another container.

echo -e "POST /containers/nginx/kill?signal=HUP HTTP/1.0\r\n" | \
nc -U /var/run/docker.sock

Brilliant! We can communicate with docker and we didn’t need to install anything else to do it!

Discovering etcd from inside a container in CoreOS

In this quick post, I show how you can discover the etcd endpoint from within a container running on CoreOS.

Reading and writing to etcd within a CoreOS is straightforward – you can use the etcdctl utility or just use regular HTTP to http://127.0.0.1:4001/v2/keys

But what about inside a container?

The CoreOS manual tells you you how to obtain the address of the docker0 interface on the host, but you still have to figure out how to get that into your container.

Here’s two alternatives you can try

Pulling the etcd endpoint from inside the container

Inside the container, you can use the address of the default gateway, as this will correspond with the docker0 interface on the host.

You could use a bash startup script for your service which uses a bit of grep and awk to build the endpoint, for example:

#!/bin/bash
ETCD_ENDPOINT=$(route|grep default|awk '{print $2}'):4001

So this is nice, but unsatisying. It’s not really finding where etcd is, it’s just exploiting a side effect of how CoreOS sets things up.

Pushing the etcd endpoint into the container

Here’s my current favourite method – we make the etcd service on the host write an environment file we can incorporate into our fleet units. To do that, we need to create a new file /run/systemd/system/etcd.service.d/30-environment.conf containing this

[Service]
#write an environment file to use in other units
ExecStartPost=/bin/bash -c "echo ETCD_ENDPOINT=${ETCD_ADDR} > /etc/etcd.environment"

You can write this file by hand and then have it take effect with

sudo systemctl daemon-reload
sudo systemctl restart etcd.service

You should see it created /etc/etcd.environment and we can include that in any fleet unit with Environment=/etc/etcd.environment, and from there it’s easy to use the ETCD_ENDPOINT variable to configure services.

This configuration isn’t permanent, we’ll lose it the next time CoreOS updates itself. You’ll need to have your provisioning system deploy it for you. Alternatively you can include a little extra bit into your cloud-config to create the file on newly minted or updated machines. Something like this would do the trick:

write_files:
- path: /run/systemd/system/etcd.service.d/30-environment.conf
  permissions: 420
  content: |
    [Service]
    #write an environment file to use in other units
    ExecStartPost=/bin/bash -c "echo ETCD_ENDPOINT=${ETCD_ADDR} > /etc/etcd.environment"

Summary

I’ve tried to show how a container can discover the etcd endpoint. The first method is fine, but I’d prefer something that wasn’t looking for a side effect, and was unequivocally told where etcd can be found. The second method does this, but is admittedly a bit more involved. I’d like to see CoreOS incorporate something like this themselves.

Hope this helps someone in the meantime!